


![]() Contax T stripped down for NEX
Contax T stripped down for NEX
![]() Unifi adoption with IPFire router
Unifi adoption with IPFire router
![]() Discontinued DSP-W215? Run OpenWRT with a web UI on it!
Discontinued DSP-W215? Run OpenWRT with a web UI on it!
![]() Lost Bitlocker recovery key on your Dell
Lost Bitlocker recovery key on your Dell
![]() Crossflash Dell SAS 5/iR to 5/i (SAS HBA)
Crossflash Dell SAS 5/iR to 5/i (SAS HBA)
![]() Rescue/force flash your corrupt Dell PERC H310
Rescue/force flash your corrupt Dell PERC H310
![]() Run Tomato on your Planet WDRT-731U
Run Tomato on your Planet WDRT-731U
![]() GZIP SVG files, the Content-Encoding header and X-Sendfile
GZIP SVG files, the Content-Encoding header and X-Sendfile
![]() TinyMCE, margins and full-screen mode
TinyMCE, margins and full-screen mode
![]() IPCop2 2GB flash image for Alix
IPCop2 2GB flash image for Alix
![]() IPCop, OpenVPN, iOS and certificates
IPCop, OpenVPN, iOS and certificates
![]() Migrate your OpenVPN settings from IpCop 1.4.x to 2.0.x
Migrate your OpenVPN settings from IpCop 1.4.x to 2.0.x
![]() Asus P5Q Raid (SteelVine and ICH10R)
Asus P5Q Raid (SteelVine and ICH10R)
![]() Recover iSCSI data from your Readynas
Recover iSCSI data from your Readynas
![]() 2.5" disks in a Netgear Readynas
2.5" disks in a Netgear Readynas
![]() Zebedee on a Netgear Readynas Ultra (x86)
Zebedee on a Netgear Readynas Ultra (x86)
![]() Run DD-WRT on your SparkLAN WX-6800 II without JTAG flashing
Run DD-WRT on your SparkLAN WX-6800 II without JTAG flashing
![]() Dell CERC SATA 1.5/6ch in Windows XP
Dell CERC SATA 1.5/6ch in Windows XP
Running OpenWRT (with web UI!) on a D-Link DSP-W215 (rev B1) power plug
The problem
Do note that these instructions won't restore the cloud functionality to your plug, or the functionality of the D-Link app. These are gone forever. End of service. Not supported. Forgotten in the parking lot. However, you can still use the plug locally, or with Home Assistant or similar systems.
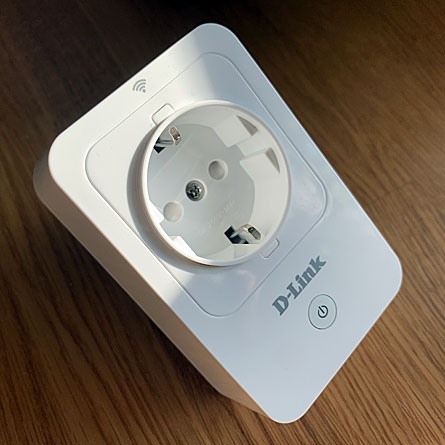
Fine by you? Let's continue! D-Link has manufactured, approximately, six bazillion different models of almost every computer-related thingamajig in the world. It's not unsurprising that one of these is a cloud-controlled power plug. It's also not surprising that I bought one of these devices when I saw it at a bargain-bin type clearance sale a couple of years ago, this actually being my first "cloud device", and the price being something like the equivalent of three sausages. Thirdly, it's not surprising that D-Link decided to pull the plug (heh) on support for this device, as cloud connected companies so often and proudly do, making the device an unusable brick when its cloud connection is shut down. There should be laws requiring devices to offer local control but I digress.
Knowing about this D-Link planned obsolescence problem I had kept my eyes on this thread, documenting the fine work by the fine people of the OpenWRT forums with hacking in an alternate firmware. I ran into a couple of problems not covered there, though, and after finally succeeding with the flash I also managed to build a self-contained web UI for the thing. These are the instructions.
The firmware flash
Generally the flashing instructions (detailed in the thread but also in the OpenWRT wiki for the device) are fine -- the device has an emergency flash procedure so you can always reflash if something goes really wrong. The factory reflash also wastes all settings so it goes back to a good, non-bricked state if you mess up your network settings.
What was not detailed there was how to connect the device to your own WiFi network and then actually accessing it. The forum thread mentions binding the WiFi client net to LAN, unfortunately that didn't work for me at all. What worked was:
Making a web UI for the DSP-W215
Now you have OpenWRT running on the plug but that's it. You can SSH to the device and issue on/off commands (and control the LEDs) but not much else. Clearly a local, unclouded, more user friendly way of controlling it is needed. Thankfully, OpenWRT already includes all stuff we need to get this working in the form of uHTTPd and Lua, which is used anyway for running the main OpenWRT web interface LuCI.
We will put the web ui on the normal HTTP port (80) and move LuCI to port 8080. You will of course need something to interact with the system via SCP/SSH, probably WinSCP and Putty if you are on Windows.
Connect to the plug's IP address with WinSCP, using the SCP protocol, username "root" and your chosen password. Then go to /etc/config and edit the file "uhttpd". It should have one or two sections, and you will have to modify it according to your wishes to add another "config uhttpd" section; use my uHTTPd config file as a reference and add the section config uhttpd 'plug', also change LuCI's port to 8080 in the first two existing list listen_http lines, or just copy everything in my file and replace the content in your own.
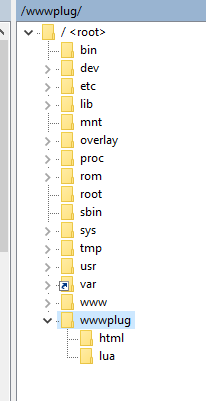
After this we will have to do a couple of things to construct the UI and put bindings to command line utilities et cetera, but this is way too long to describe, suffice to say that I mucked around with LuCI's construction/how it was ran by uHTTPd and managed to construct something that is probably sub-optimal but to everyone's surprise actually works. You might have noticed a "wwwplug" path in the config file; download the zip with the web UI here and unzip everything in it, then put the resulting structure in /wwwplug (a non-existing folder you must create in the root of the device). You don't have to set any rights or anything. It should look like this:
We must also install an additional package. Go to System/Software, click "Update lists" and then put "uhttpd-mod-lua" in the "Filter" box and install it.
Now restart the plug. You can do this nicely from LuCI/SSH or you can just remove it from the power socket and reattach it. After booting, you can browse the normal IP address (you might have to clear your browser cache if it's still trying to redirect to LuCI) to see the on/off web UI; LuCI is now on http://your.plugs.local.ip.address:8080 (also linked at the bottom of the web UI). You should see this:


Bonus, controlling the plug from other things
If you are using other systems to control plugs you can just make simple GET requests ("visit/fetch a web address") to do stuff.
http://your.plugs.local.ip.address/cgi-bin/plug/poweron
turns the power on,
http://your.plugs.local.ip.address/cgi-bin/plug/poweroff
turns it off and
http://your.plugs.local.ip.address/cgi-bin/plug/powerstatus
returns only 0 or 1, depending on power status, for use with some rule you might want to construct, I dunno man!
The physical power button on the device is not working, this is not my fault but (possibly) a limitation of the OpenWRT system and (certainly) the status of current research into the device.
Modifications and extra niceties