


![]() Contax T stripped down for NEX
Contax T stripped down for NEX
![]() Unifi adoption with IPFire router
Unifi adoption with IPFire router
![]() Discontinued DSP-W215? Run OpenWRT with a web UI on it!
Discontinued DSP-W215? Run OpenWRT with a web UI on it!
![]() Lost Bitlocker recovery key on your Dell
Lost Bitlocker recovery key on your Dell
![]() Crossflash Dell SAS 5/iR to 5/i (SAS HBA)
Crossflash Dell SAS 5/iR to 5/i (SAS HBA)
![]() Rescue/force flash your corrupt Dell PERC H310
Rescue/force flash your corrupt Dell PERC H310
![]() Run Tomato on your Planet WDRT-731U
Run Tomato on your Planet WDRT-731U
![]() GZIP SVG files, the Content-Encoding header and X-Sendfile
GZIP SVG files, the Content-Encoding header and X-Sendfile
![]() TinyMCE, margins and full-screen mode
TinyMCE, margins and full-screen mode
![]() IPCop2 2GB flash image for Alix
IPCop2 2GB flash image for Alix
![]() IPCop, OpenVPN, iOS and certificates
IPCop, OpenVPN, iOS and certificates
![]() Migrate your OpenVPN settings from IpCop 1.4.x to 2.0.x
Migrate your OpenVPN settings from IpCop 1.4.x to 2.0.x
![]() Asus P5Q Raid (SteelVine and ICH10R)
Asus P5Q Raid (SteelVine and ICH10R)
![]() Recover iSCSI data from your Readynas
Recover iSCSI data from your Readynas
![]() 2.5" disks in a Netgear Readynas
2.5" disks in a Netgear Readynas
![]() Zebedee on a Netgear Readynas Ultra (x86)
Zebedee on a Netgear Readynas Ultra (x86)
![]() Run DD-WRT on your SparkLAN WX-6800 II without JTAG flashing
Run DD-WRT on your SparkLAN WX-6800 II without JTAG flashing
![]() Dell CERC SATA 1.5/6ch in Windows XP
Dell CERC SATA 1.5/6ch in Windows XP
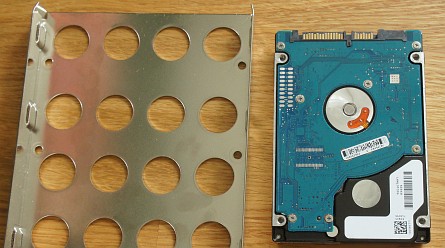
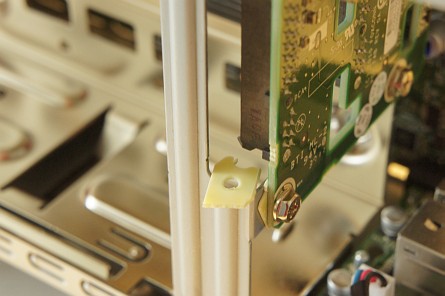
2.5" disks in a Netgear Readynas
The problem
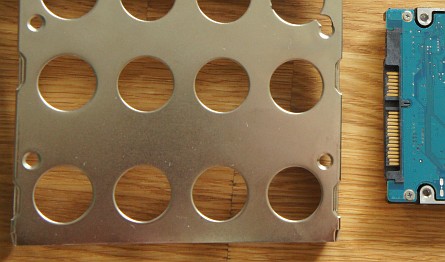
All Netgear Readynas NAS models (Duo, Ultra, Pro) seem to have the same hot-swap tray. It is a good, sturdy tray, but is has no mounting possibilities for 2.5" hard disks such as laptop disks, SSD disks, or the Western Digital Velociraptor series. Only 3.5" desktop disks are supported. This is, as they say in more academic circles, teh suxorz.

Above: Proud, strong, supported disk. Below: Look how sad the unsupported drive looks, with its non-aligning, unsupported mounting holes. Boo hoo!
You can buy docks, of course, but they cost money and may actually provide worse cooling of your precious disk. Also, most docks and mechanical adapters won't care about the positioning of the SATA connectors, which is crucial in this case.
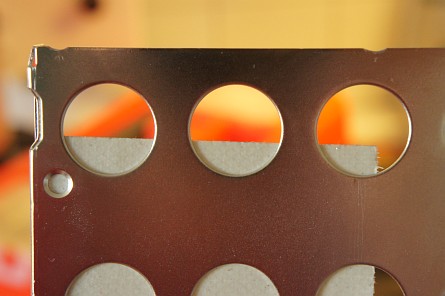
The solution
I guess fate, God, or someone at Netgear, designed this tray so you can make it accept 2.5" disks anyway. You can use normal screws, or preferrably flat-headed screws, to just fix the drive in place with three screws with no modification at all. I am of course going to use high-speed cutting tools instead to get a fourth "hole". Use your Dremel, or other high-speed cutting tool of choice, to cut out a segment like this. One hole only, and only this hole! Look below for the finished result if you are unsure. Try to leave as much material as possible to provide a "landing pad" for the mounting area on the hard drive, or you might short out the circuit board... or just use a sheet of thin plastic or duct tape to isolate the disk afterwards.
Then mount the disk using the screws like this. The screws will fit snugly around the frame.
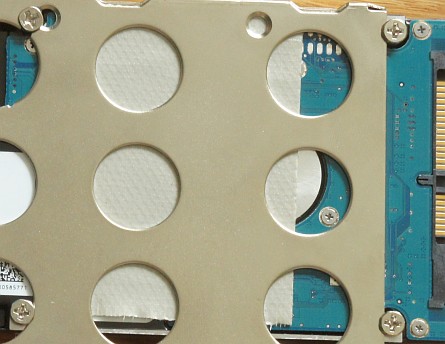
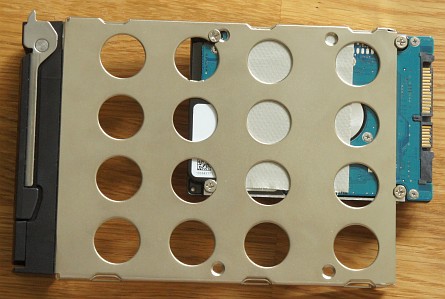
The finished product
Because all SATA connectors are positioned the same on a hard disk regardless of its technology and size, aligning it in this way will work with every standard SATA disk made (that I know of -- my lawyer made me add this). Flat-headed screws will fit perfectly inside the NAS (I haven't tested with larger ones), and there is no rattle from mounting the disk like this.
Do note that there may be problems with using laptop drives in a NAS, specifically due to head parking under Linux (these devices run Debian Linux, as you are certainly aware of) and/or drive spin down due to the more aggressive power savings in laptop drives. I have had Hitachi laptop drives parking their way to The Eternal Parking Dumpster in this way. You are completely on your own on this -- it must be researched for each individual disk model, and please don't mail me about it :-)
Post scriptum
User emoacht on the Readynas forum points out that there is indeed a slight size variation -- a drive mounted in this manner will stick out a tiny bit more (1-1.5mm) and put some extra pressure on the circuit board it attaches to. He is completely right, and you might want to modify your NAS accordingly, depending on your general attitude to hardware. :-) Making measurements, the circuit board flexes about half a millimeter when the drive is in place, due to mechanical tolerances in other places some slack is taken up elsewhere. However you might want to add some spacers between the circuit board and frame holes so the flexing is spread over a longer distance (to the other two, unmodified mounting points).

Above, the mounting points without spacers and with screws removed. Below, one spacer mounted and one idling nearby.
After this modification (my spacers were 0.7mm thick) the outer drive will fit as snugly as the inner drive, with (I hope) completely controlled flexing of the board.
You can also try filing down the front a little at the location of the screws:
...which is what I actually ended up doing. Here you must be careful, though, because if you do too much filing, the screw which should fit inside the large hole at the middle of the tray might not stay attached to it -- or you will have to use a screw with a larger head.